| |
|
|
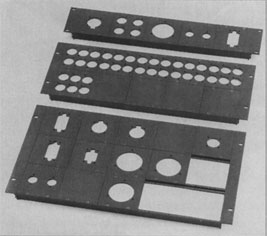
Alternatively, you can buy blank panels and jacks, or custom, premounted jack panels from such vendors as Mid Atlantic (see Fig. 2). With this approach, you can make up your own patch panels that mix different types of connectors. Never drill through the rack; mount the sockets on the panel. As an extra touch, Bell sometimes uses hinged connector panels that swing out 90 degrees to expose the wiring.
To make your life easier and your connections cleaner, you can buy short, high-quality guitar or instrument cables and cut them in half. Solder the wire ends to the custom patch panel and plug the other end into the rack-mounted devices. This takes advantage of the cables' professionally soldered connectors and strain relief. The racks can be connected via 8- or 16-channel, multiconductor snakes, with fan-outs and 1/4-inch connectors. Sometimes you can use separate cables loomed together into custom snakes. In INXS' tour rig, the patch panels were professionally wired, but the interconnects were simply loomed cables. This lets the tech staff change the inter-rack cabling arrangement quickly to address unexpected problems. In some situations, you may have to split the audio signal path. This approach lets you feed the mains and an onstage monitor system or recording rig. If your rack is completely self-contained, or will be traveling on an extended tour, you can hardwire a split signal path. But most of the time, it's still better to use patch bays with normals. This lets you connect everything in the rack to anything outside of the rack. The mixer (or audio rack, in Bell's system) is also wired to patch points, and the synths are normaled to the mixer. Multipin connectors are not necessarily the best choice for traveling club rigs, as they don't allow a lot of flexibility and could leave you in a bad way if a pin gets damaged. However, Bartschi notes that for an extended tour-say, six months-you can hardwire the rack gear to a multipin connector for the ultimate in rapid setup and teardown. Multipins also can be a good way to interconnect studio racks, and you could take advantage of this to integrate your live rig into your home studio. In this case, use a hardwired split or a patch bay to send identical signals to an Elco 96-pin or similar connector (for the studio connection) and the patch bay (for the stage rig). Thanks to companies such as Pacific Radio and David Carroll Electronics, an increasing number of professionally wired multipin-connector options are available. Bell advises that if you have an extensive rig-say, $10,000 worth of gear-it's worth a few extra bucks to investigate these options rather than risking it bad soldering job by rolling your own. Getting Juiced First of all, make sure the wall outlet or other house power source is properly wired and grounded. "On Solid Ground, Part 1" explains how to check this. If the house power is badly miswired, and the venue's manager or owner won't call in an electrician (or let you call one), blow off the gig! Yes, I can hear you muttering about that option, but if the AC isn't properly grounded, |
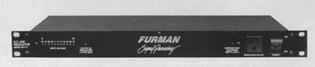
everything you have-including your body-could get blown off, and all the line conditioning in the world won't help. Speaking of line conditioning, a power conditioner is mandatory for live or studio work. Don't even think about playing live without AC protection of some sort, and if possible, put a power conditioner in each rack. Most people use a standard line conditioner/power distributor, which protects against surges and spikes and filters out radio frequency (RF) and electromagnetic (EM) interference. However, as your friendly local senior editor, I strongly urge you to use a full-blown line regulator, such as the Furman AR-117 (see Fig. 3). This makes sure that even if the power drops as low as 90V or surges as high as 140V, your gear will receive a clean 117 VAC (again assuming the house power supply is properly grounded). As Ernie Bartschi says, "Touring without it line regulator is like building a race car and forgetting to put the wheels on."
As with studio electrical systems, it's best to have one ground source for everything. Bartschi follows tile classic professional technique of grounding the mixer, which is the center of the system, to the main power supply and floating the other components' chassis grounds. This is a job for a pro; don't attempt this if you aren't absolutely sure you know what you're doing. Bryan Bell prefers to power his racks with Juice Goose RP300 power conditioners, because they are reliable, adapt to multinational power standards, and offer individual ground lifts. That way, you don't have to modify your gear to avoid ground loops. Bell used these power conditioners when setting up Lee Ritenour's studio and solved some thorny grounding problems in just a few minutes. (Unfortunately, the RP3O0 is no longer available, but it's possible the manufacturer would bring them back if enough people wanted to buy them.) Power your rack with heavy-gauge AC cables (12 gauge, 3-conductor at least). Good connectors are important, too. Bartschi recommends that you rackmount a 20 amp, twist-lock, Bryant or Hubbell 3-pin power connector. (Hubbell connectors are available at most electrical supply houses.) Between the connector and the cable, you're looking at $50 for a secure power line. You have to drill a mounting hole out of a 2-space rack panel and flush-mount the connector. There are two schools of thought about how to keep gear from grounding to the rack racks. "Noise Killers" covers it method that relies on plastic shoulder washers or Humfree insulators. A variation on this theme is to run strips of electrical tape along the rack rails, though this rarely insulates the screw holes. The other school says that with modern gear, you rarely have to worry about insulating from the rack. You pay your money and take your choice. Odds and Ends Finally, Bartschi absolutely insists that his clients take ten minutes out of their music day to do their homework. "I take it for granted that you will put the research time in, collect articles, and study them, so you're approaching your gig with a pro attitude. Take your time. If you have a question about any of this stuff, and you're not sure how to proceed, call the tech, read EM articles, and call the manufacturer for technical advice. Don't give up; be relentless. If you call and get a bad attitude, try another day, because you'll be the winner when you get it sorted out." Okay, class is dismissed for the day. It's time to go out and play! |
return to top |
|