| |
|
|
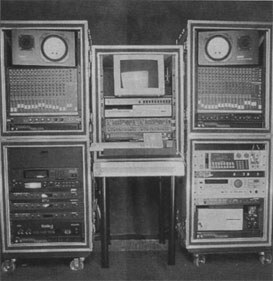
For example, Herbie Hancock has a one-space "guest artist" rig that he can carry in a taxi. Jan Hammer maintains a similar traveling rig. Thanks to careful planning and the sonic capabilities of modern synths and samplers, they have learned to do more with less. For those times when his clients need their own mixing and effects, Bell creates a separate audio rack. This includes a mixer and all signal processors (except those in the synths). Although Hancock often takes just his instrument rig to a commercial studio, he also has an audio rack for submixing in his home studio and on tour. One variation I have found useful is to mount a line mixer within the synth rack. Onstage, this provides a synth mixer for a compact, single-rack system. In the studio, it serves as a submixer, possibly even mixing devices outside the rack that connect via the patch bay. For songwriters who tour extensively, Bell creates a third type of rack: the writing block. This rack contains the writing and digital components, such as a computer, a modular digital multitrack tape machine, etc. For example, on INXS' recent tour, drummer John Ferriss wanted an extensive songwriting rig for his hotel room. To accommodate him, Bell designed a multitrack system dubbed "The Racks of Love" (see Fig. 1). The system's instrument and audio/mixing modules can be integrated into the band's stage setup, if necessary.
In addition, the Racks of Love include a composing/recording module that contains a Macintosh CPU with a Digidesign Pro Tools system, a hard disk, and a DAT recorder. Although Ferriss used this module in his hotel room, you could use the same method to add sequences and digital tape tracks to a live show. The main point is to design autonomous racks that can be interconnected as a system. (We'll discuss interconnection schemes later.) Choosing a Rack Other pros, including Bell, prefer racks made of an extremely lightweight, corrugated plastic, such as Lexan or Lexalite. This type of construction is available from manufacturers such as Jan Al or SKB. The biggest advantage here is the dramatic difference in weight. However, you can't drill holes in a plastic rack. Although I have heard of plastic racks cracking, have never seen it. Seeking a compromise between appearance and function, Bell sometimes uses small 0mnirax rack modules, with an oak-veneer finish, as inner racks. He places these in Lexan road cases, which gives him the "artsy" look of a wooden rack and the lightweight protection of high-impact plastic. Shock Mounting There are at least three types of shock-mounting. The most common has 2-inch foam surrounding the inner frame, with an outside ATA case. Another style uses rails attached to rubber pin mounts in the rack. A third variety, used in SKB racks, uses a set of tightly coiled wires that act like a heavy spring. The obvious purpose of the rack's front and back covers is to protect its contents. But if you buy racks with deep covers, you also can make the lids carry something. The lids on INXS' Racks of Love are deep enough to carry table legs, which attach to the lids, making them into tables. One lid also carries DAT tapes, and another holds the snakes. Every lid has a double purpose. By the way, for racks that will be rolled around, don't forget to get top-quality casters, too. Order Out Of Chaos Bartschi and Bell take somewhat different approaches when deciding the vertical location of rack-mounted devices. The two methods also have a lot in common, and they are equally valid. I'll examine both and let you decide which you prefer. A lot of equipment racks are front-loaded and clumsy. To help you balance the weight of the rack between the front and rear, look for items that can be rear-mounted. Power conditioners (discussed shortly) and small monitor amplifiers are natural candidates, but don't overlook programmable, remote-controlled devices. If you program these devices from the computer and don't need to see their screens during performance, you might be able to hide them in the rear. Easy visual access also is a concern in many cases. Whether standing or sitting, you have to be able to see and get to certain items, such as mixers, a graphic EQ, and so on. Sometimes this overrides the other factors. Cooling With Fans |
preamps and small monitor amps. Therefore, he often mounts a 3-rack-space fan to the rear rails, especially in racks with four or more devices. This combines with carefully placed vent panels, which help the fan draw air in the front and out the back. "The old style was to pull cool air in toward the bottom of the rack and exhaust hot air out a vent at the top, but most guys don't want a top vent anymore, notes Bartschi. "But you still need a vent space at the upper part of the rack and a fan in the middle of the rear." The problem with a vented top is that moisture can enter. Instead, Bartschi prefers front vents in the top rackspace. It is especially important to place vent panels immediately above major heat sources, such as power amplifiers and tube preamps. Some power amp models don't have a built-in fan; even if this type of power amp has a big heat sink, Bartschi places a fan where it will blow into the back, with a vent directly in the front. Standard, rack-mount P.A. fans run at a high speed, which is fine for cooling most gear. But tube preamps or rackmount Leslie tubes must be warm to the touch for the tubes to produce the desired tone. A variable-rate fan lets you adjust the fan speed to cool tube devices just enough that they don't burn up. Because he controls the airflow with a fan and vents, Bartschi's decisions about what goes where are based primarily on weight, support, and access. For touring rigs, he tries to get the rack in an evenly balanced setup, so he avoids having deep pieces on top and shallow ones on the bottom. However, he does not necessarily place all of the gear in order from deepest to shallowest. Therefore, rear support is a big issue, especially when the rack is likely to bounce around during transport.
By using rear rack supports for the deepest gear. Bartschi can place individual items wherever convenience dictates. For example, if one piece is too close to another and causes noise, he has to do some swapping. "Trial and error is part of the game," Bartschi muses. You can't get frustrated. The end result is a rack that lasts." Cooling With Convection Because Bell's ventilation scheme depends on natural convection, air flow is a key part of his stacking strategy. In this scheme, devices are stacked with the deepest units on the bottom and the shallowest on top. Combined with strategically placed vent panels, this creates the desired natural airflow. Like Bartschi, Bell is concerned about weight distribution, and like his colleague, he will violate his stacking guidelines if a unit must be at the top for visual access. Cables You must be especially careful to separate cables that carry different types of signals. In an instrument rack, run power cables down one side, audio cables down the other side, and MIDI cables straight up the back. For a computer rack, run power and digital signals down the two sides and SCSI down the middle. For an amp rack, speaker cables go up the middle. There are lots of ways to label your cables, including plastic numbers, gummed labels, or my old standby, marked masking-tape loops. It's less important which you use, just so you clearly mark both ends of every cable. Strain relief for your cables is extremely important, as is keeping your connectors from falling out during transportation, so tie down all cables-not just audio cables-with wire wraps or service loops and anchor them to the frame of the rack. Interconnecting the Blocks Flexibility is a primary concern. You want to be able to handle all your studio and live gigs without rewiring your rig. In addition, you'll need a fast, clean setup. Ideally, you should never have to reach inside the rack unless you're effecting a repair. That means you need all your connections mounted on the rear rails. There are four common ways to do this: a patch bay, a custom-built patch panel, a multipin connector, and snakes or sets of individual cables that are connected to the individual devices inside the rack. This last method is the cheapest way out, and it's acceptable in a permanent installation, such as a studio. Many club musicians wire each piece directly because they don't want to buy patch bays or never thought about it. But it's clumsy and impractical to reach inside the rack and connect each piece every time you move it. We'll focus on more professional approaches. Commercial studios often use patch bays with Tiny Telephone (TT) connectors. These provide top fidelity and, because of their small size, let you fit more wiring in less rack space. However, this solution is not so good for traveling rigs and home studios, because you need custom cables and snakes to interface the TT connectors with the 1/4-inch phone jacks used on most synths and semipro effects processors. A more common solution is to use patch bays with 1/4-inch connectors on every rack. This provides the ultimate in flexibility, as you can access the vast majority of mixers and musical instruments and many effects processors without using adapters. |
return to top |
|