On Solid Ground, part 2 |
|
|
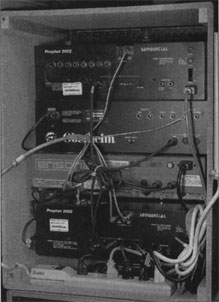
Make sure all unbalanced equipment is isolated in the rack. If you have both balanced and unbalanced equipment, try to keep them in separate racks, or face the possibility of unavoidable ground loops. You don't want the metal housing from each piece of rack-mounted gear to touch its neighbor and cause a ground loop, so if you are using a wooden rack, make sure you leave a bit of space between each piece of equipment. Rack-mount gear also can find a path to ground through the rack's metal mounting rails. The most common insulation method is to use nylon washers on the front and back of the gear's rack ears. You also can run some electrical tape down the rails. Even then, rack screws can touch the rack where they go through the holes, especially since the insulating paint scrapes off the screws with repeated use. The solution is to use nylon washers in the form of collars that go inside the screw holes. (These washers often are used for mounting voltage regulators to heat sinks.) Check your local electronics and industrial hardware supply stores. You also can use nylon mounting bolts to secure lightweight equipment that won't be moved. However, nylon bolts aren't very strong, so don't use them for touring racks or heavy gear such as power amps. Once your equipment is in the rack, turn it around and look at the back. See that bunch of AC cords just hanging there? They are bad news when you start plugging in audio cables. AC power cords emit electromagnetic fields that can cause EMI in audio cables.
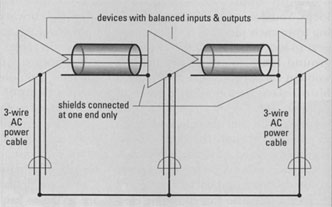
The best way to get around this problem is to clean up your wiring act. Your friend in this endeavor is the cable tie, which can be bought at any electronic-parts supply house. (If you rewire your gear often make sure to get reusable cable ties or use regular plastic garbage-bag ties.) Run all power cords down one side of the rack, tying them together as you go, and terminate them at a rack-mount power conditioner or a power strip bolted to the rack's left rear side. (Most standard AC cables connect on the equipment's left side as you face the rear, but there are exceptions, as shown in Fig. 2.) Bunch the AC cables; do not bundle them into a loop. Run your audio cables along the opposite side. If you have an open-frame rack, don't wrap the cables around the support poles or you will create an electromagnet. Beware of external "wall-wart" power supplies, as they are a major source of EMI. If these external supplies convert to DC, keep them away from AC cables, treating them like audio cables. If all your equipment is plugged into the same grounded circuit, you reduce the possibility of ground loops. But if different parts of your rack |
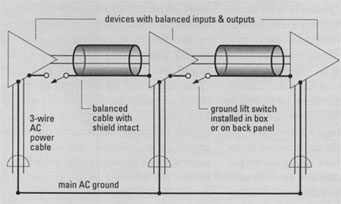
are plugged into different circuits with different grounds, you will encounter problems when you connect their audio signals through the patch bay or mixer bus. This is particularly important if you are trying to use two pieces of equipment that are in different rooms with different AC outlets. When all this careful wiring is done, you should have one power cord coming out of your rack and no mess. You should have AC power running down one side of your rack and audio cables down the other (see Fig. 2). Keep speaker cables away from both audio and AC cables. MIDI cables can emit RFI, as well, so keep them away from audio lines. If necessary, you usually can get away with running AC and MIDI cables together. Also remember that anything with a power transformer radiates a magnetic field that can cut right through the shielding of your audio cables, so make sure your power amp and the power supply for your mixer are at least a few feet away from your equipment. The magnetic fields drop off exponentially, so even a little distance between cable runs can help a lot. Audio Cables If your studio is a -10 dBV unbalanced system (usually RCA and 1/4-inch phone plugs), keep the entire studio that way. Don't try to wire one or two pieces of equipment with balanced lines. Keep your mixer, outboard gear, and tape deck physically close together so cable runs are as short as possible. In some cases, the best you can do with an unbalanced system is bundle the audio cables close together to reduce the area of an unavoidable ground loop, which minimizes the ground loop's potential to act as an antenna. In a balanced-line system, the shield doesn't carry the audio signal. One way to stop a ground loop in a balanced system is to cut the shield at one end of an audio cable, eliminating one path to ground. This is called a telescoping shield (see Fig. 3a). This cannot be done with a single-conductor, shielded, unbalanced-line system. However, if your system is unbalanced but your cable has two conductors plus the shield, connect one conductor to positive and one to negative at both ends and the shield to negative at one end. If a device has a ground-lift switch or removable link in the terminal strip that disconnects the signal ground from the chassis ground, use that instead of cutting the shield (see Fig. 3b).
|
return to top |
<previous | next> |